Window Cornices, cont.
Designing your cornice
Design elements within your home should dictate the wood type, molding styles
and finishes that you select. Match the existing trim or other details in your
home. You can expand into something a bit more elaborate, but don't stray too
far. At the home center, you'll find a molding or some combination of moldings
that'll complement any home style.
Depending on the design, the top either overlaps the sides, sometimes with a routed
edge, or is nailed to the top or inside of the box and doesn't show from below.
The tops are best made from 1x4s, 1x6s or 1x8s. There's no need to cut the tops
to width if you choose the right combination of top style and board size. The
example we show is a 1x6 nailed on top of the box, which gives an overall inside
depth of 4-3/4 in. For the same look but with a shallower box, you could also
nail a 1x4 inside the box flush with the top for a depth of 3-1/2 in. Choose whichever
method it takes to clear your curtains.
 |
|
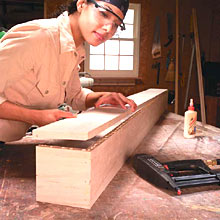
PHOTO 4:
Cut the top board to length to fit flush with the front and sides of the
box (depending on the design). Glue and nail the top to the box frame with
1-1/2 in. brads spaced every 6 in.
|
 |
|
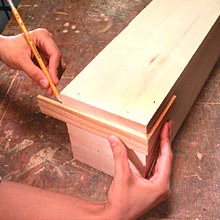
PHOTO 5:
Using a short test piece, fit the end piece and mark and cut it to fit.
Use the test piece to accurately position the trim while you glue and nail
it to the box. Cut the miter on the long front piece of trim, fit it to
the first piece, mark its length, then cut and fasten it. Repeat the steps
for the other end.
|
 |
|
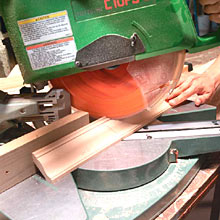
PHOTO 6:
Cut the two crown molding end pieces about 1 in. longer than needed with
opposite 45-degree angles on one end of each piece (you're cutting a right
and left
corner).
|
 |
|
PHOTO 7:
Flip the box upside down and prop the crown-molding end against the box.
Use the other end as a test piece to line up the miters. Mark and cut
the piece to length. Smear a little glue along the bottom and tack it
to the cornice with a couple of 1-in. brads.
TIP
Build up short fences to support
crown moldings while cutting by screwing 1x4 boards to the saw fence through
the predrilled holes in the fence.
|
 |
|
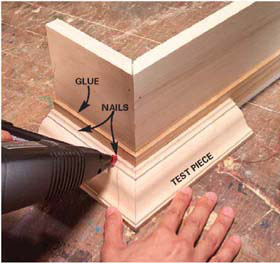
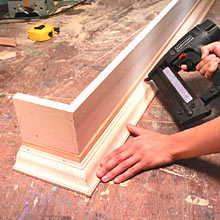
PHOTO 8:
Cut a miter on the front piece of crown molding and scribe the other end
to length. Cut the second miter a little long, and then test-fit it using
the loose end again. Check the fit and trim until it's perfect. Glue and
nail the miters together, then nail the molding to the cornice box. Cut
and install the last end piece of molding.
|
|