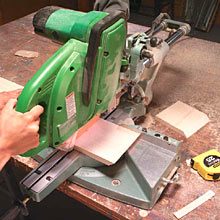
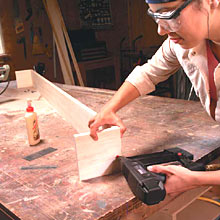
Window Cornices, cont.Using a compound or sliding compound miter sawThe best tool for cutting miters on wide boards (1x6s) is either a 10-in. compound miter saw or a sliding compound saw. Standard compound saws work like typical miter saws, but the motor and blade tip sideways, making them capable of cutting bevels. A sliding compound miter saw cuts compound angles too, but the motor and blade slide on tracks so it can handle wider stock.Be sure to use a sharp finish-cutting blade in either one. Prices for standard compound miter saws start as little as $100 or you can rent one for about $35 per day. You can predrill and hand-nail most of the project, but an air-powered brad nailer with 1 and 1-1/2 in. brads makes the job much easier. Some of the cheaper ones sell for less than $100, or you can rent one for about $25 per day. (Rent one of the special airless ones and you'll save the price of renting a compressor.) But for the money, compound miter saws and brad nailers are far too cheap and far too fun not to own them yourself. Build the basic box, then add the trimEvery cornice begins the same way, with cutting and assembling the three-sided, lidded box (Photos 2-4). Then you add the trim of your choice (Photos 5-9) and finish the cornice (Photo 11). The cornice is then ready for mounting on the wall by screwing it to a 1x2 that's screwed to the wall above the opening (Photos 12 and 14).Begin by measuring the curtain and valance for length, depth and width (Photo 1). Measure with the curtains open so you take into account their thickness when they're bunched. Add an inch or so to the depth and the width of the curtain rod to make sure the cornice will cover everything. Miter the ends and front box pieces first. It's easiest to square up the board, then tilt the miter saw to cut a 45-degree bevel for the first end piece and then square it up to cut the second end (Photo 2). The mitered corners are glued and nailed together with 1-in. brads. Measure the assembly to determine the exact length for the top. When mitering the box trim, always start by first cutting and mounting an end trim piece, then the long front trim and finally the other end. That way, you'll be able to check fits and get crisp miters at each corner. Fit each miter, then scribe the length of each piece rather than measuring (Photo 5). It's faster and much more accurate. It's best to cut pieces just a tad long so you can shave them down until they fit perfectly. If you're new to woodworking, it's nice to have a helper by your side to hold the miters together while you're scribing lengths or fastening parts. Cutting crown molding is a little trickyThe trick to cutting perfect crown molding miters is to rest the molding upside down and against the bed and fence while cutting the 45-degree angles (Photo 6). If you cut wide crown molding, you may have to extend the fence height by screwing a length of 1x4 to the miter saw fence through the holes in the back. Remember that the long point of the miter is the top edge. That'll help you remember which way to angle the saw before cutting. To further eliminate the costly mistake of miscutting an angle, draw a light line while you're fitting the piece to indicate the proper angle (Photo 6).FinishingFill nail holes and prime before painting. If your cornices have elaborate details like dentil blocking, you'll get better results with several light coats of spray paint instead of brushing. Finish highly detailed natural and stained wood with spray lacquer, shellac or polyurethane.Prepaint the 1x2 cornice ledger to match the wall before you put it up if you think it'll show after the window covering is in place.
|